Showing posts with label Pokemon. Show all posts

Tuesday, September 2, 2014

Charizard Cosplay: Full Costume Reveal!

Salt Lake Comic Con starts on Thursday and we are just about ready!!!
I've had a bunch of people asking me to take pictures of me wearing the full costume, so here it is! I'm still fine tuning a couple of details, but this gives you a pretty good idea of what the final product is going to look like...

I'm almost done with the Alpha Geek's Pokemon Trainer Red costume too - the Pokeballs are for his costume ;) I'm looking forward to seeing fellow cosplayers at the con so feel free to say hi!

Monday, August 25, 2014

Charizard Cosplay: It's the details that make the difference

SLC Comic Con is next week! Fortunately, I'm almost done with my Charizard gijinka cosplay so I had some time this weekend to work on the details:
Shoes - After looking at the whole thing together I decided I didn't like the blue on the shoes so I decided to use basic acrylic paint in Antique Gold to make the shoes match the feel of the rest of the costume.
Taking it to the next level - I got some air dry clay, sculpted claws, sanded them with a nail file, and painted them with a 1:1 mixture of white acrylic paint and modge podge. I glued them to the shoes with super glue and you can kind of see that I went up the side of the claws a little bit to secure them more and to look like cuticles. 
Scale Test - I wanted to treat the pants so they weren't so plain. Even though this is a anthropomorphized Charizard, I want to make sure every element of the costume looks intentional. I'm not just wearing an orange outfit - Every piece is influenced by the dragon subject.  I'm going to do this scale effect on the thighs and calfs so it has a slimming effect as well  as adding cool texture.
Stay tuned for the makeup/hair test and full costume reveal!

Friday, August 22, 2014

Flame on! Charizard Cosplay Progress: Tail

Almost done! Last night I edged my fabric and bustled this sucker up by hand. I'm so glad I took the time to make that duct tape dress form because that made the process sooooo much easier! I just pinned the fabric to the bodice, pinned up where I wanted to bustle it, and sewed a couple of stitches at each pin up. I gathered the tip of the tail and just secured it with a rubber band for now:
Next, I grabbed the EL Wire I got from the SLC Comic Con Cosplay class and threaded it through the bustling of the tail so it came out the tip. I coiled it around the tip of the tail and secured again with rubber bands. I wrapped some sparkly red, yellow, and orange tulle and wrapped it haphazardly around the wire. I secured again with rubber bands so I could check the effect of the lighting before I secure everything. You can't really tell in the picture because There is too much light coming in my window, but the tip of the tail is actually in shadow and the orange glow coming from the center of the "flame" actually looks really cool! 
Tonight I'll attach the tail to the bodice and secure the tip. I still have a couple of details I want to touch up, but as soonas the tail is attached to the bodice I will actually have the whole costume in a wearable state to try on! Yay! 

Thursday, August 14, 2014

It's go time! Charizard Cosplay Progress

I realized this week that there are just 3 weeks left until SLC Comic Con! It is still a work in progress, but this week I got the teal added to the wings, made a frame for them out of metal rods, and mounted them to a cardboard base. The cardboard will ultimately be attached to a sweet orange backpack, but the metal rods go around all of the edges so it is sturdy enough to support itself. I also decided this week to make the yellow part of Charizard's tummy a corset/wide belt and braided teal ribbon to use as the ties - I thought the teal would accent the wings nicely. I re-styled the wig a bit so the tips of the horns flare out and look more flame like and I bought orange hair ties so they would blend in better. I left a bunch of hair out in the front because I am still deciding if I want to braid it back or trim bangs... I figure I can decide that once I do my hair/makeup test. I bought some orange eye-shadow and lipstick this week so I hope to do my makeup test this weekend.


Up Next: 
- Attach wing frame to backpack & cover ugly cardboard w/orange fabric.
- Clean up and seal fabric edges of wings.
- Add copper scale detailing to pants.
- Sew tail, attach to corset, and set up light effects for flame.
- Hair/makeup test.
- If time - sculpt claws & attach to shoes
- Sew vest for Pokemon Trainer
- Paint pokeballs & attach to belt for Pokemon Trainer

Tuesday, July 8, 2014

Charizard Cosplay Update: Styling the Wig and Covering the Wings

If there is one thing I've learned from studying costume and makeup design in college it is that 
DETAILS MATTER!!! 

In this case, I decided to take my cosplay to the next level by getting an orange wig to match the feel of the character. Since I am doing a humanized interpretation of the character as opposed to a fur suit style costume, I thought it would be really cool to make Charizard's horns out of the hair of the wig. I was inspired by this awesome design:


http://tarnished-sanity.tumblr.com/post/63619720635/pokemon-gijinka

The wig was thinner and had shorter layers than I would have liked, so I couldn't do the fishtail style lke in the above picture and I had to get creative to get the right thickness to the horns. First, I brushed out the wig, sprayed some water on it, and gave it a good blow dry with some texturizing and volumizing sprays. 

*** A note on styling synthetic wigs: Most cosplay wigs are synthetic which means that the hair fibers are actually plastic. Be VERY careful with heat styling! Make sure you blow dry on a mid to low setting and NEVER use a curling iron and/or straightener or you will melt the fibers of the wig. If anyone is interested I can do a more detailed post on styling wigs later.***

Cosplay is a game of "use what you have to make what you want." Example: I actually used the cardboard from a Hamburger Helper box to make two cylinders to form the structure for the horns. Then, I put the wig on my styrofoam head form and positioned them on the head and cut the bottoms at the correct angle to match Charizard's horns.
See? They sweep back from the front of the head.

I used straight sewing pins to secure the wig and horns to the form to make styling easier - I styled around the pins holding the horns in place and carefully removed them once the style could hold on its own. 

First, I pulled the hair around the horns up to cover the cardboard and pinned in place. I added hair bands for support and because I liked the texture it gave. To give added texture like the inspiration picture, I began braiding sections of hair around the base of the horn horns and wrapped it up around the horn and around the base. Once I had something I liked I added a strip of the same orange fabric I am using for the wings to the top of the horn to hide some extra pins and just because I thought it would look cool.

Here is a picture of one of the horns "finished" and the other one in progress:
I say "finished" because I may add more ribbon or braids...
I also made some more progress on the wings this week:

I cut the scalloped bottom for both wings together and left the top alone. Since this is satin it started to fray where I cut it so I sealed the bottom edge with nail polish so I wouldn't have to sew. Then, I folded down the top over the structure of the wing, hot glued it and pinned it in place, and trimmed the excess fabric. I will glue that last piece of fabric down once I get the wire frame in place - I left it open so it would be easier and I would be less likely to catch the wire on the fabric and rip it. 

Next steps: cut out adhesive interfacing and teal fabric for the inside of the wing and iron in place. Then I get to figure out how to do the wire frame to mount the wings to the sweet orange backpack I got. 

*** Let me know if you like what you see or if you have any suggestions. Thanks friends! ***


Monday, June 30, 2014

Duct Tape Shenanigans and Charizard Cosplay Progress

I decided last week that I need a dress form if I am to be a proper cosplayer, but rather than spend the $100-$200 to get a plus size dress form (yes, I'm still a bit "curvy"... read: fat) I decided to try something I found on Pinterest and make my own out of duct tape. I realized at the final stage that I should have been taking process pictures, but it is a rather awkward experience so I suppose it was for the best. 

The process is fairly simple: Put on a shirt and pair of pants/shorts that you are willing to sacrifice to the cause, get 2-5 rolls of duct tape depending on your size, and find someone you trust a whole lot to wrap you in duct tape. Here is the tutorial that I used and found the most useful: http://offbeatbride.com/2010/11/duct-tape-dress-form 

And here is my result: 

It looks like a creepy, purple amputee and I still need to smooth out the form in a few places and seal the neck, but overall it worked pretty well. It probably won't be sturdy enough to build my wings on, but it will definitely make pattern-making a lot easier and more effective. I will be using this to create the tail piece for my Charizard gijinka cosplay. Speaking of which, I found the perfect shoes! 
Thank you little boys' dept of Walmart for trying to bring back the 80's! I also bought some polymer clay to sculpt claws that I will attach to the shoes with E600 adhesive. 

Last week I got the second wing wire structure shaped and covered with foam, so fabric comes next! I figured out the shape of the wings in the last post so I will get them cut out tonight and begin the process of attaching the fabric to the structure. I am going to use a hot glue gun to wrap the orange fabric around the frame and heat bond adhesive interfacing to attach the teal fabric to the inside of the wing. 

*** Stay tuned for more cosplay fun! ***

Thursday, June 26, 2014

Charizard Cosplay: Part 1 - Wings

Its almost that time again... Convention time! T-minus 70 days until Salt Lake City Comic Con :) The Alpha Geek and I decided to cosplay as Red from the Pokemon games and Charizard - Gijinka style. I almost did the Pokemon X Mega Evolution, but I opted to go traditional so I could be a little more recognizable. I'm not saying every cosplay has to be obvious, but that was my feeling at the time. After looking at some pictures and taking stock of how much work I wanted to put into this, I drew up a quick design on my tablet:

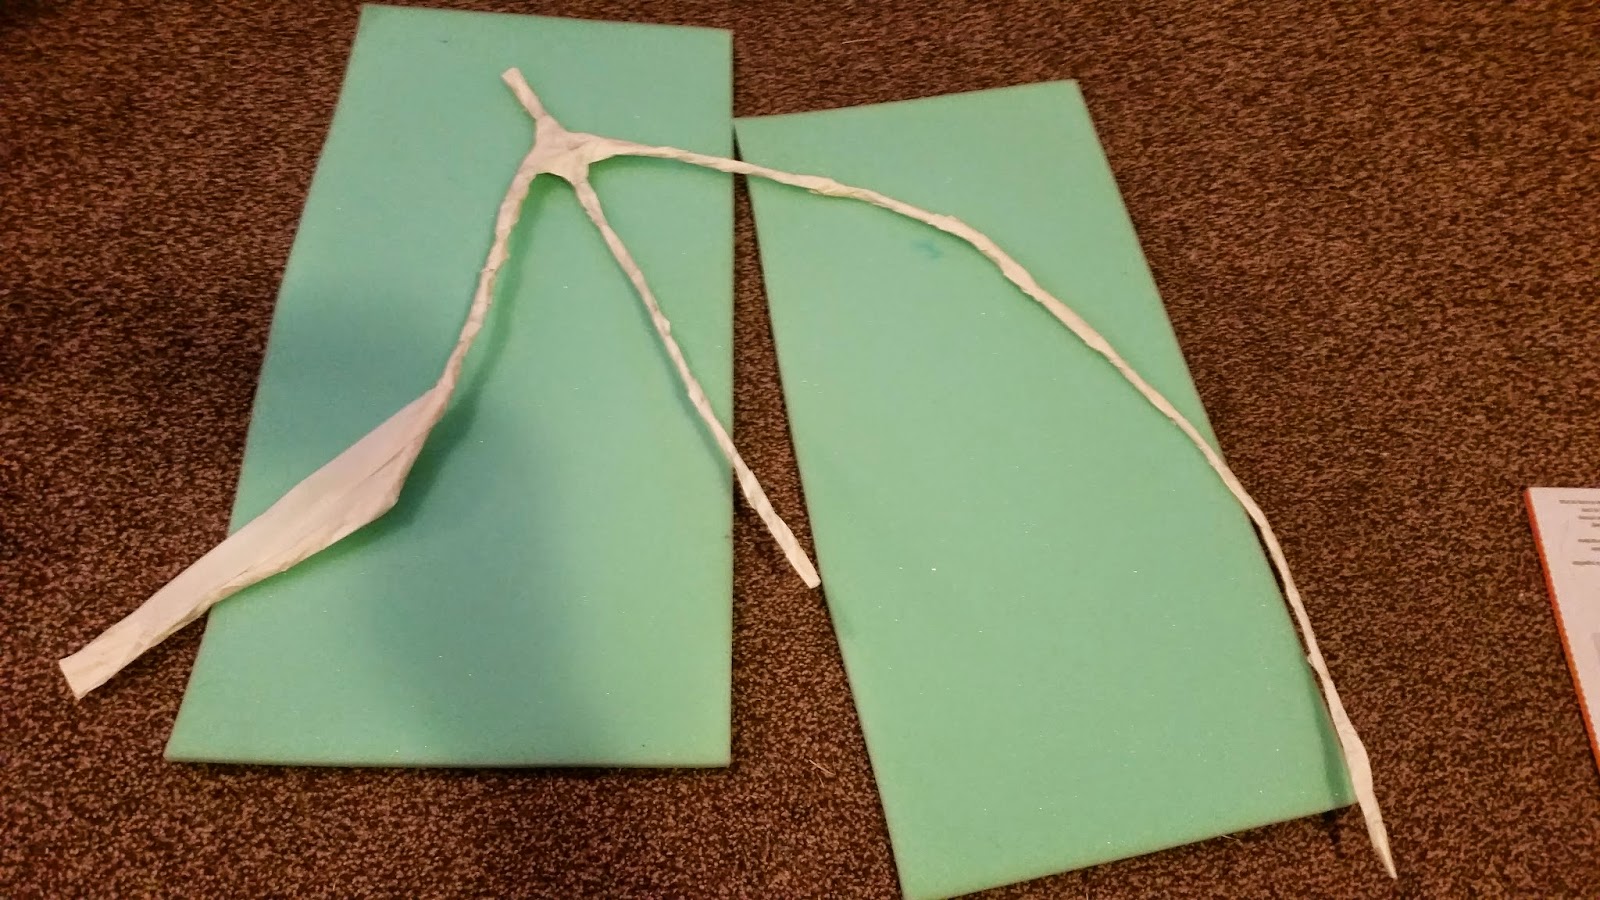
I figured the wings would be the most difficult/most time consuming so I decided to start there. I got some 12 gauge wire wrapped around itself at least 2 thick to make the frame for the wings. I used regular masking tape to cover the pointy edges while I worked:

After I still managed to slice my thumb I opted to cover the whole frame with tape which also served to make it a little more sturdy:

I know, it still looks pitiful, that's where that 1/2 inch foam the frame is laying on comes in! I cut strips of foam and sandwiched the wire frame between them using E600 glue. I put a heavy dictionary on top while it dried to ensure a good seal. Then, I used scissors to round off the edges and get the shape I wanted:

I've been using a pencil on the wrong side of the fabric to figure out the shape of the bottom of the wing and I hope to get it cut out tonight. If you look at the Charizard reference pics above you can see that the long edge of the wing isn't a smooth line so I am going to bend the wire a bit before I cut to get it right. 

Also, I should note that the 12 gauge wire is not going to be sturdy enough to support the wings with the wire and fabric so I got a few metal rods that I am going to bend to make the frame that connects the wings to my back and the rods will go up the top "arm" part of the wing to support the whole structure. I debated using PVC, but it was too heavy and bulky. I wanted something with a little give so it is easier to walk through crowds at the con. I can collapse these wings down and if someone bumps me the wires can bend so they don't get whacked with a solid PVC pipe. In the future I am considering doing a Gargoyles cosplay and the sheer size of those wings will require something more sturdy like PVC, but the wire and rods should work to support these smaller wings. 

*** Part 2 coming soon! Let me know if you have any questions or suggestions. Thanks! ***


Tuesday, April 1, 2014

Best April Fool Idea Ever! Google Maps Has Been Overrun by Pokemon!


If you don’t have an Android or an iPhone you need to make friends with someone who does so you can enjoy Google’s April Fool’s Day prank - turning Google Maps into a Pokemon game! If you have a smartphone, make sure you have Google Maps installed, open the app, and click on the search bar. You will see a Pokeball icon below the search bar - click on it to have some fun!


Just scroll around until you find another Pokemon and tap on them to catch them!


If you are too lazy to hunt for all 150 yourself you can check out the PokemonAprilFools Wiki. According to the Wiki you may also be able to capture Pokemon #151 after you catch the other 150. If you don't know which Pokemon that is you can hand in your geek badge at the nearest Pokemon Center. Have fun and go catch 'em all!