My wonderful mother has been a bit of a closet geek for years and she recently discovered Dr. Who. It brings me great joy that she has felt like she can show off her geeky side a bit more around the Alpha Geek and I for obvious reasons ;) As a result, I thought I should make her something epic for Mother's Day to encourage her geeky pursuits:


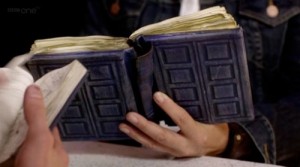
I assume if you clicked on the link that this project does not need an explanation, but in case it does: This is the journal that the Doctor gives to River Song - my Mom's favorite companion :) ... two emoticons in one post... sorry! Also, this is my artistic interpretation of the journal as opposed to a perfect re-creation and I will explain that more later.
Process:
I apologize for forgetting to take process pictures, but I'll try to explain as best I can in case you would like to make your own... I looked at pictures of River's journal online and found a fabric bound journal at Walmart that looked to be around the right size - it wasn't quite thick enough, but the length and width were pretty close:
 |
| http://www.onecobble.com/2011/09/23/making-river-songs-journal/ |
Note that it is shorter and wider than a lot of the standard journal sizes. During my research I found a template to print a "dust jacket" that I decided to use as a starting point:
If you have ever tried printing a picture off your computer on regular paper using a standard printer you are probably already aware that the print out does not always match the picture on your computer screen. I lost a lot of the contrast in printing and the picture turned out a lot more teal than I would have liked and I could not rectify that entirely, but I am still pleased with the overall result.
After I printed the template I wrapped it around my journal and discovered that it was a little small, so I centered it and made light creases for the spine. I coated the front cover in a thick layer of Modge Podge and applied my template.
* I added a thick layer of the Modge Podge because the journal's original cover was fabric and I wanted to make sure the fabric could soak up enough of the Modge Podge so the cover would actually stay put. If you are working with a vinyl or other smooth-surface journal you will need to do a thin layer of Modge Podge so the paper won't soak it all up and get wrinkled.*
Once everything was dry I used thin strips of duct tape to secure the edges since some of them were not long enough to wrap around the edges of the book. Then, I went over everything with a thin layer of Modge Podge and let it dry. After that layer dried I applied another thicker layer, but this time I used my sponge brush to create a rough, leathery texture instead of just keeping things smooth. I think I did about 3 layers like this and then left it overnight to dry.
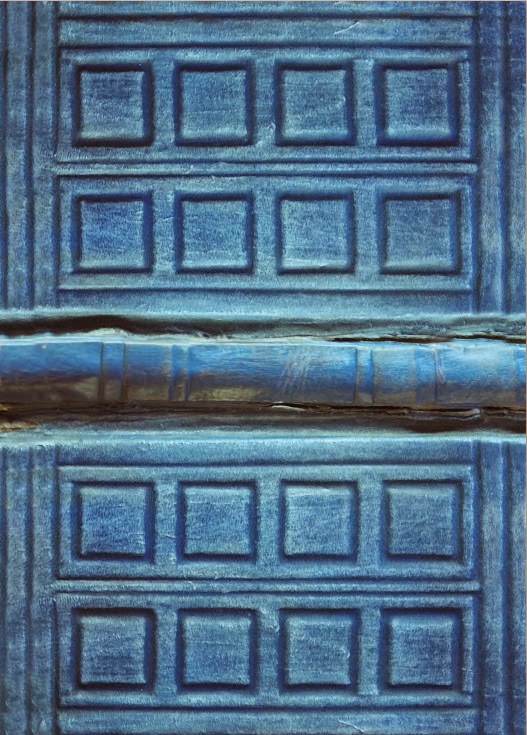
The next day I was pretty please with the texture so now it was time to paint. I needed to cover the duct tape, add some contrast, and try to make the teal more blue. I used basic blue, black, and white acrylic paint and a thin paintbrush and went to town while I watched Dr. Who for inspiration. When the paint looked the way I wanted to I added another layer of Modge Podge to seal it. I could have stopped here, but I just watched an episode where they show that cool gold dust from the heart of the Tardis and I remembered the cool gold acrylic I used on my Triforce shoes a while back. I mixed a tiny bit of the gold with my Modge Podge and sponged it on lightly and haphazardly to imitate the magical-ness of the show - and yes, I have decided "magical-ness" is a word now. You can't see it too well in the picture, but it looks awesome and my mom loved it!
Finally, I wanted to make actual indentations in the cover instead of just using paint. I had some cardboard that I considered using before I glued the cover on, but I wasn't happy with how it looked. Instead, I went back after everything had dried and used the "wrong" end of a pen to physically make the lines you see in the cover. Once I was done I added another thin layer of black in the creases to make them stand out and called it done! I thought about aging the pages, but my husband said I should leave it and let my mom decide.
*** Overall I am happy with the result and I'm looking forward to posting some more geeky craft projects! What do you guys think? Does anyone have any cool ideas that you would like me to try? ***
Thanks for stopping by and please come back soon!
No comments:
Post a Comment